¶ General information
With the do-it-yourself mode for lecturers, you can independently conduct online and on-site e-exams in Dynexite.
RWTH-specific information: For Dynexite exams outside MfL working hours (Mon-Fri, 8 a.m.-6 p.m.), the use of DIY mode is mandatory.
RWTH-specific information - Note on participation in e-exams / exercises: Login is via RWTH SSO. Multifactor authentication is required for this. Participants must generate a second factor in the Selfservice via the token manager in order to access SSO-protected services. This does not apply to on-site e-exams (login via student ID number).
In DIY mode, you start exams, monitor progress, and - if justified - can end attempts, reactivate them, or grant additional time.
¶ Preparations
Carry out the exam preparation and creation as usual.
Here you can find a video on the Dynexite do-it-yourself-mode for lecturers.
¶ On the day of the exam
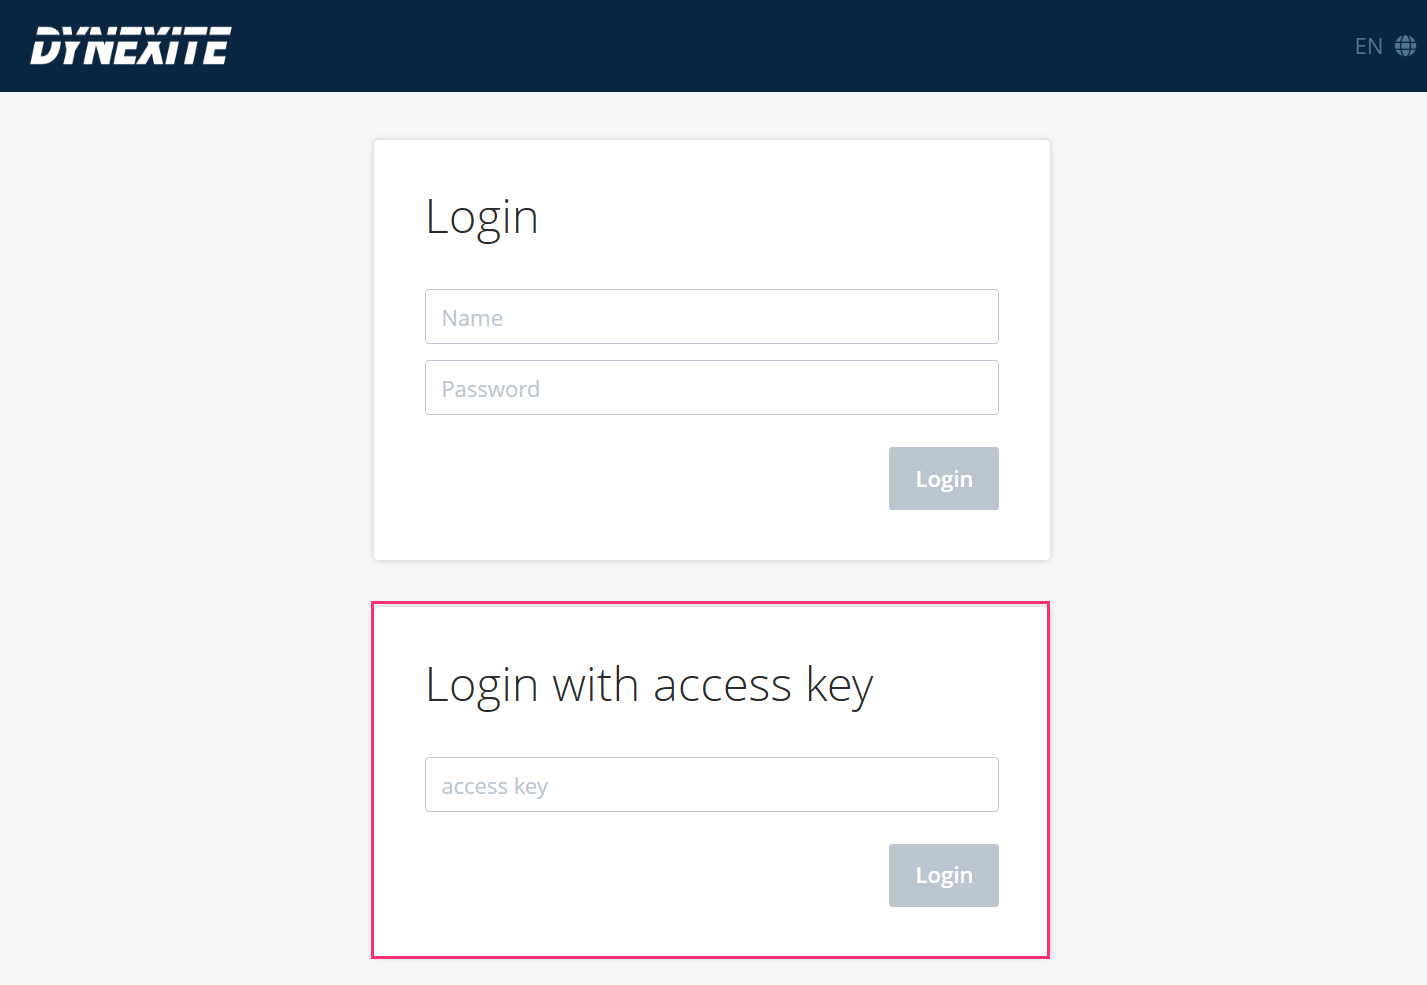
- You will receive an exam link in advance (e.g. https://s1.dynexite.rwth-aachen.de). Forward it to the students.
- For login, use the same link with the addition of /admin (also z.B. https://s1.dynexite.rwth-aachen.de/admin).
- Enter the access key that you received before the exam.
¶ Select exam
After logging in, you will see the exam.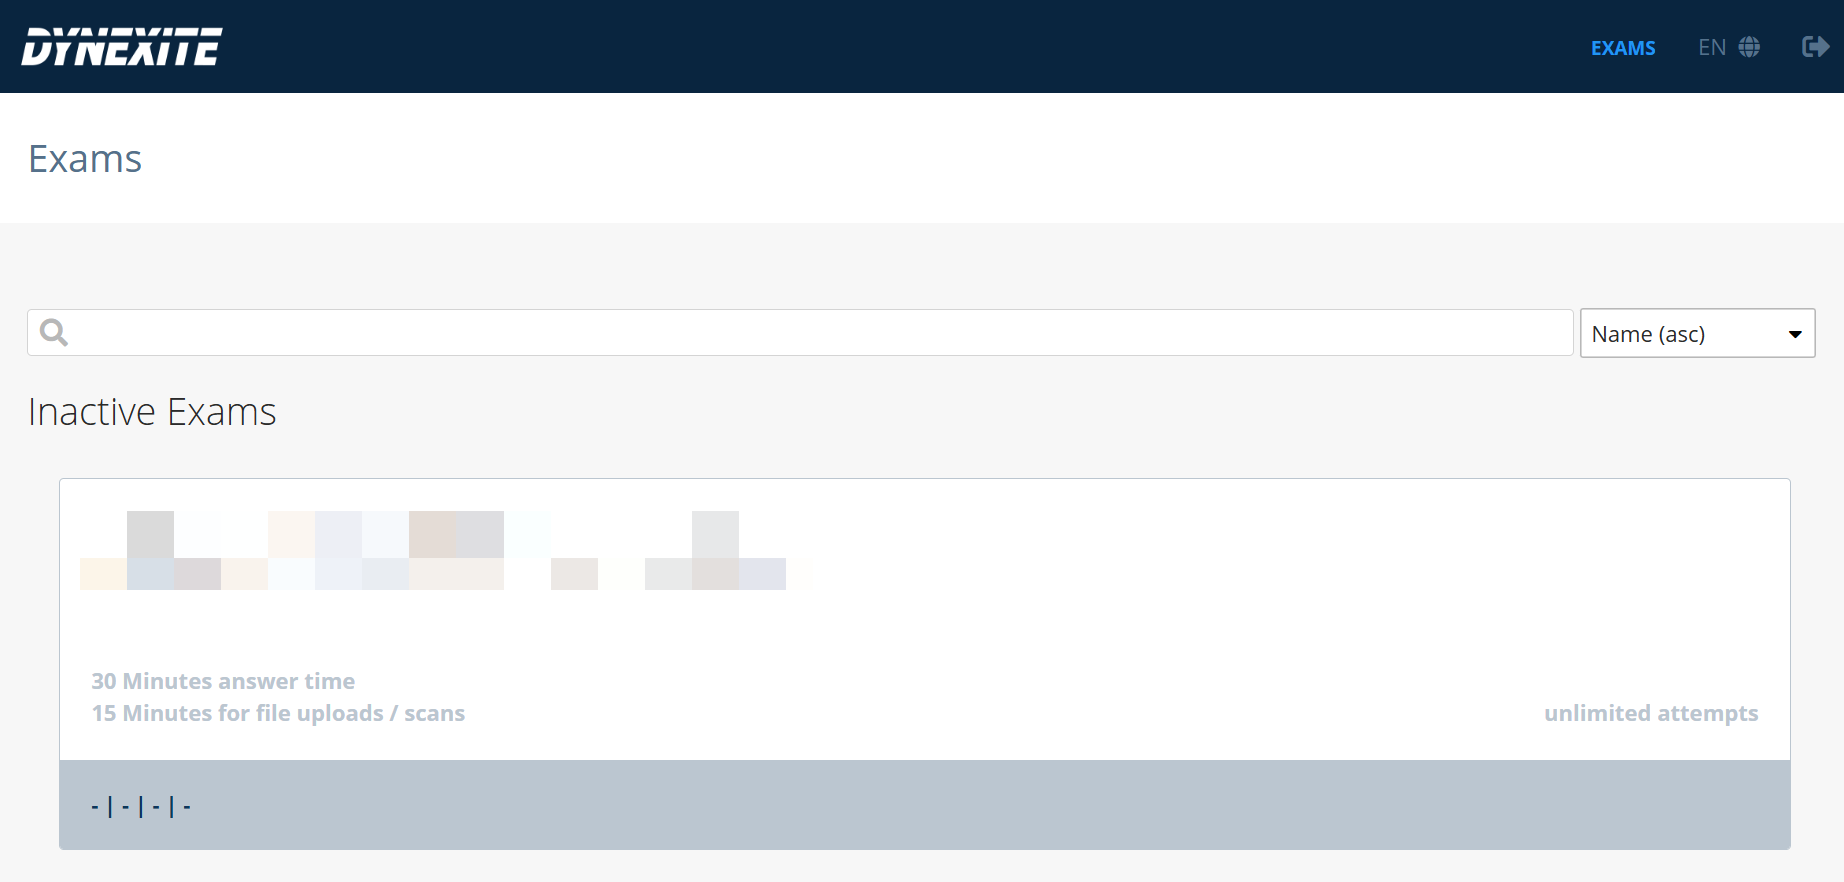
Click on the exam to open the exam supervision interface. This includes:
¶ Exam details
This section displays general information about the exam.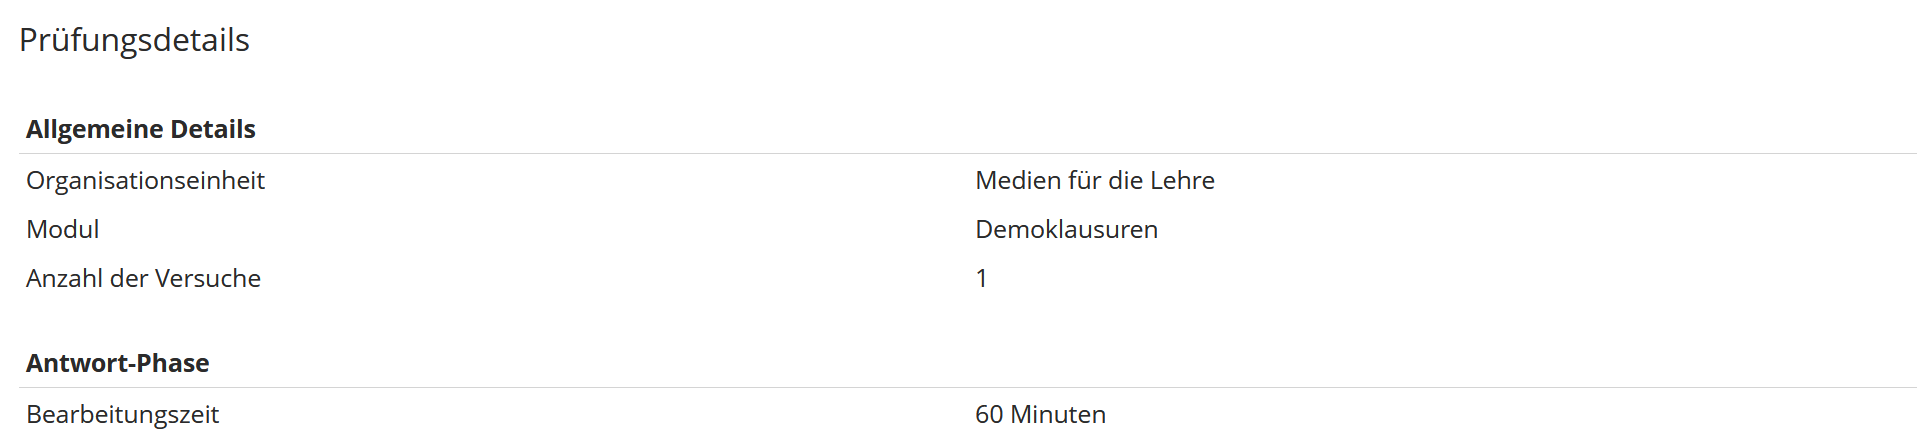
¶ Settings and Actions
Here you can edit the additional information text and extend the exam duration.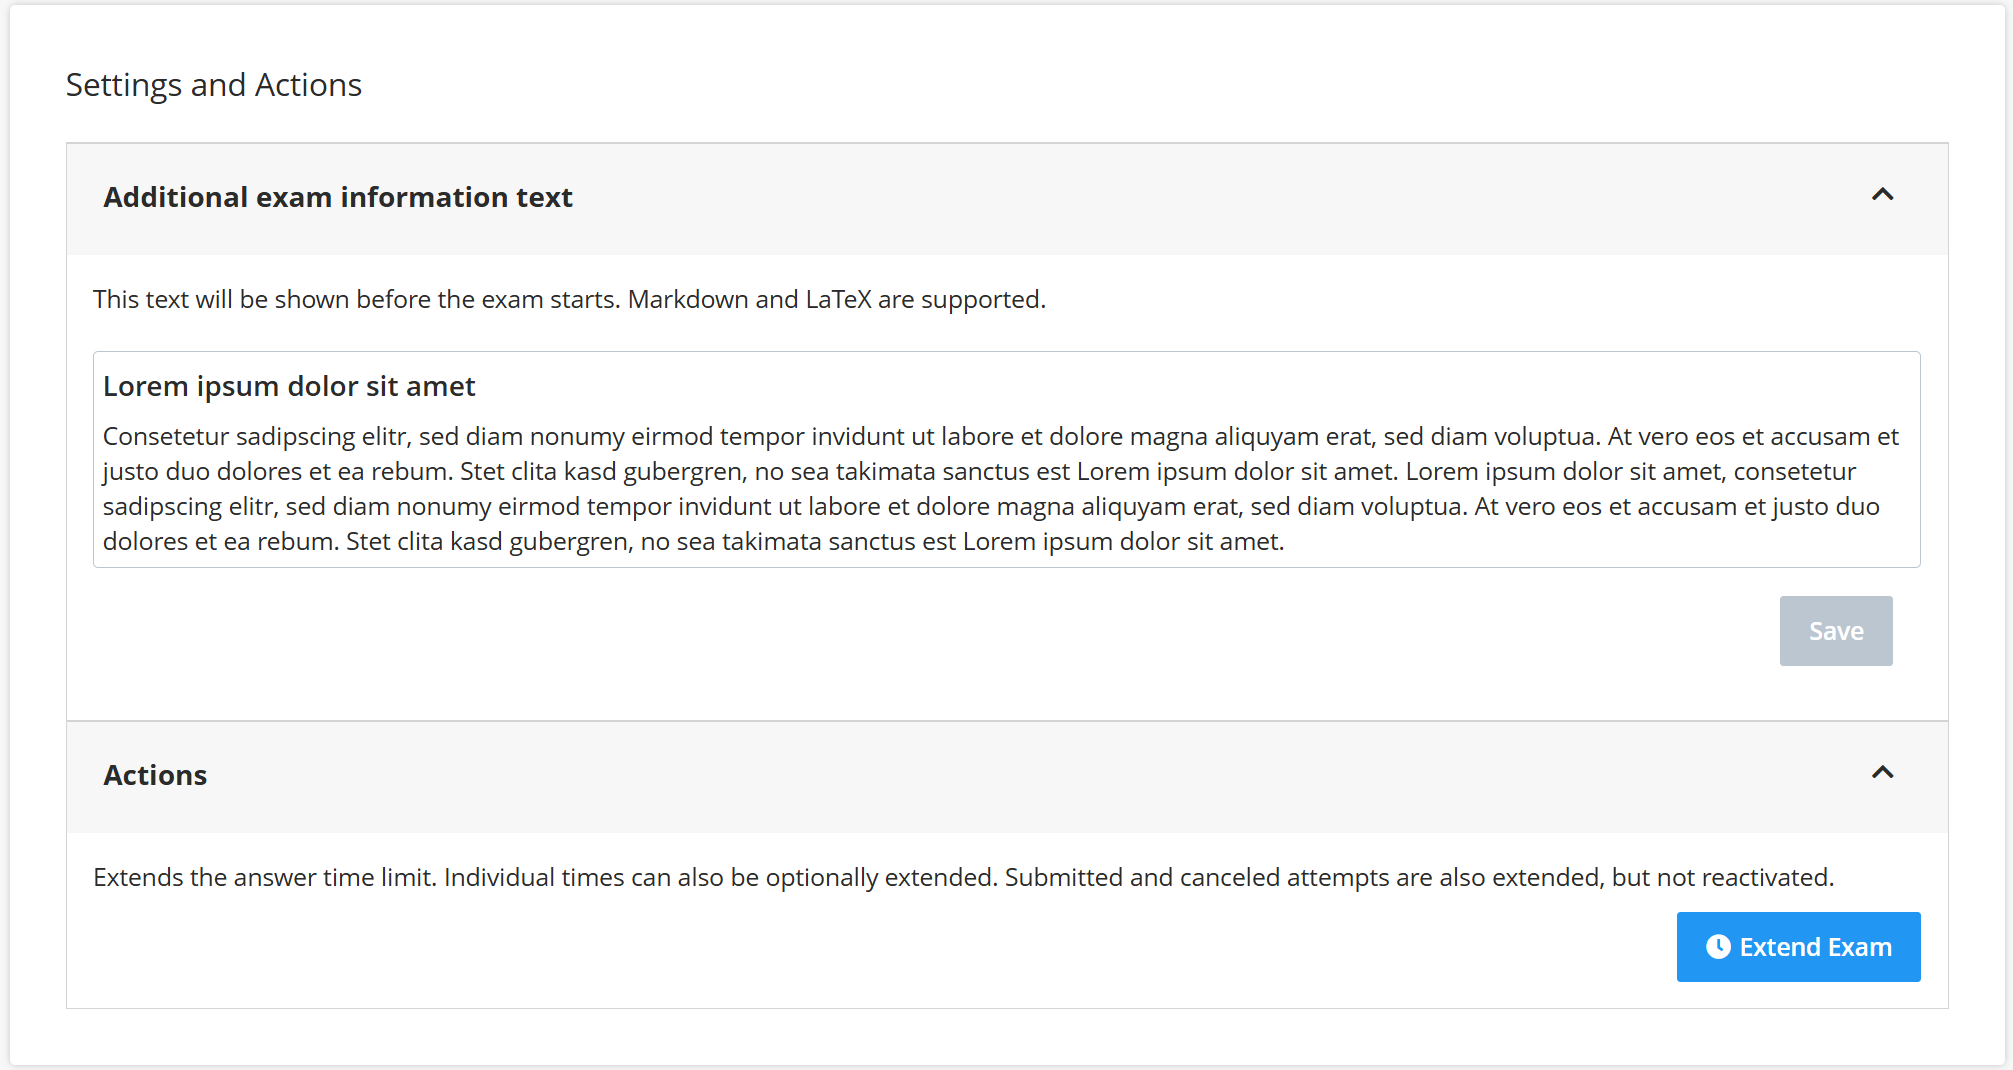
¶ Additional exam information text
Text entered in exam development (step 5) can be edited here.
¶ Actions
In this section, you can change the exam duration for all students. Clicking Extend Exam opens the Extend answer phase window.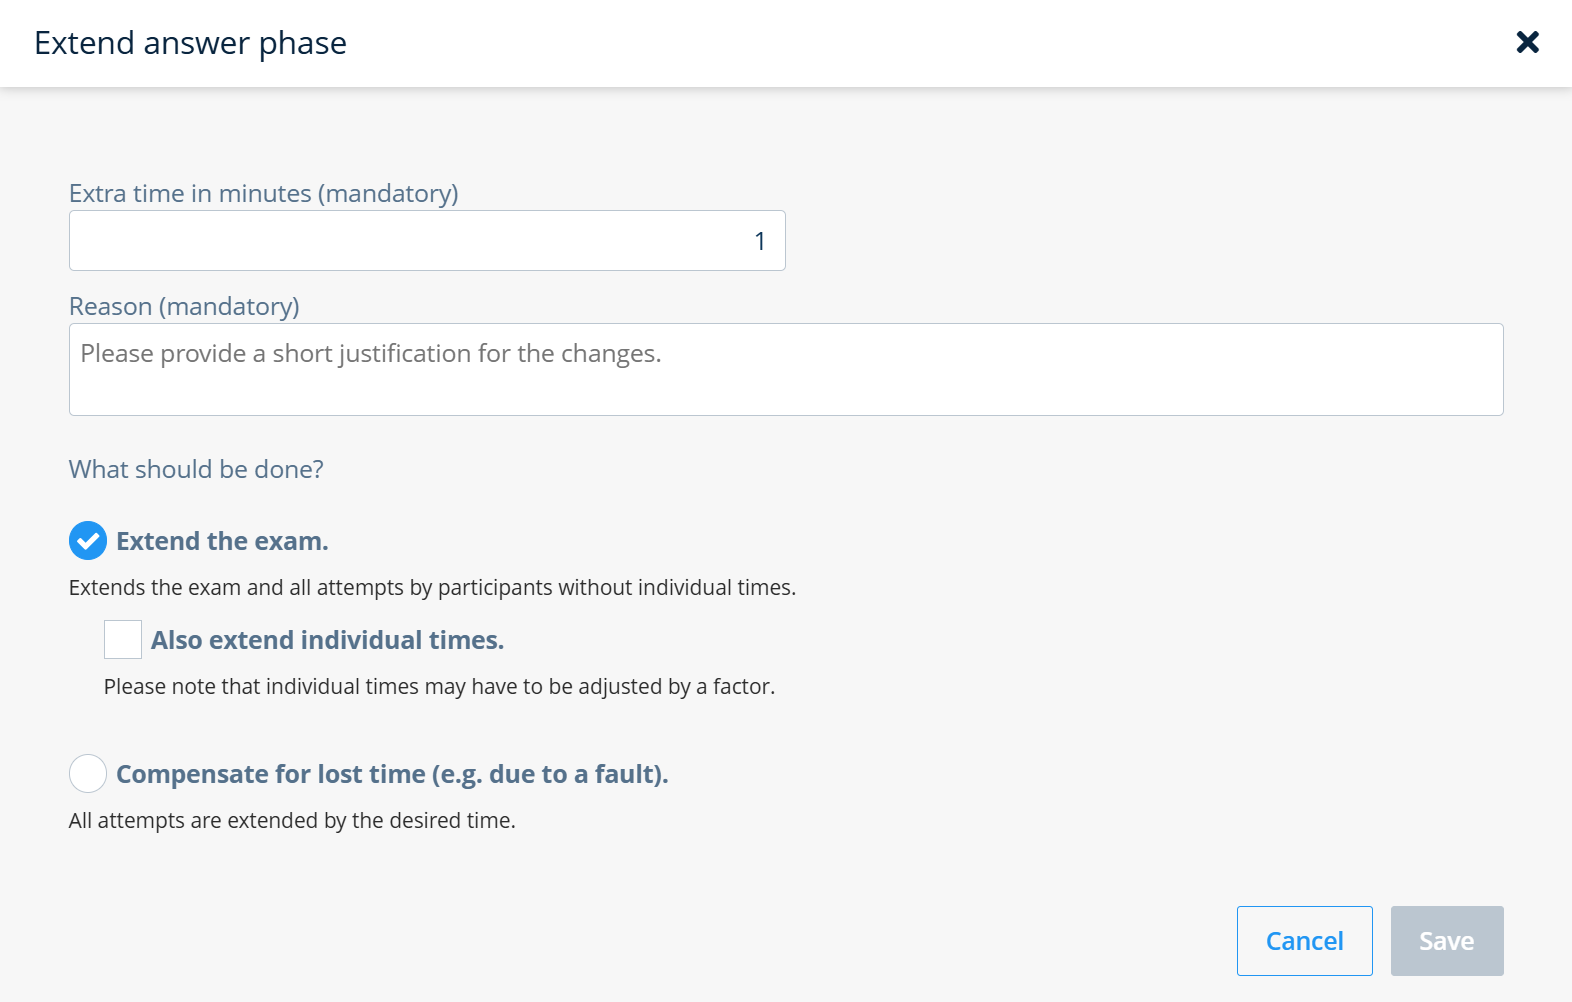
Fill in the required fields Extra time in minutes and Reason.
- Enable Compensate for lost time if all students should receive the specified additional time.
- The option Extend the exam allows you to consider students with individual exam duration (e.g. as part of disability accommodations) separately.
- If combined with the checkbox Also extend individual times, these students will receive an extension equal to that of the other participants.
- If the checkbox remains disabled, you can adjust the exam duration for these students individually via the Actions menu in the Exam participants table (answer phase only).
Click Save to apply the time extension and store the reason in the exam log.
If the exam consists of an answer phase and an upload phase, separate options are available to extend each phase. At present, the upload phase cannot be extended individually for each student via the Actions menu.
¶ State of the Exam
This section controls the exam phases. The display varies depending on whether an upload phase (a separate time window for file uploads) is configured.
¶ Exam states (no upload-phase)
Here you control the individual exam states.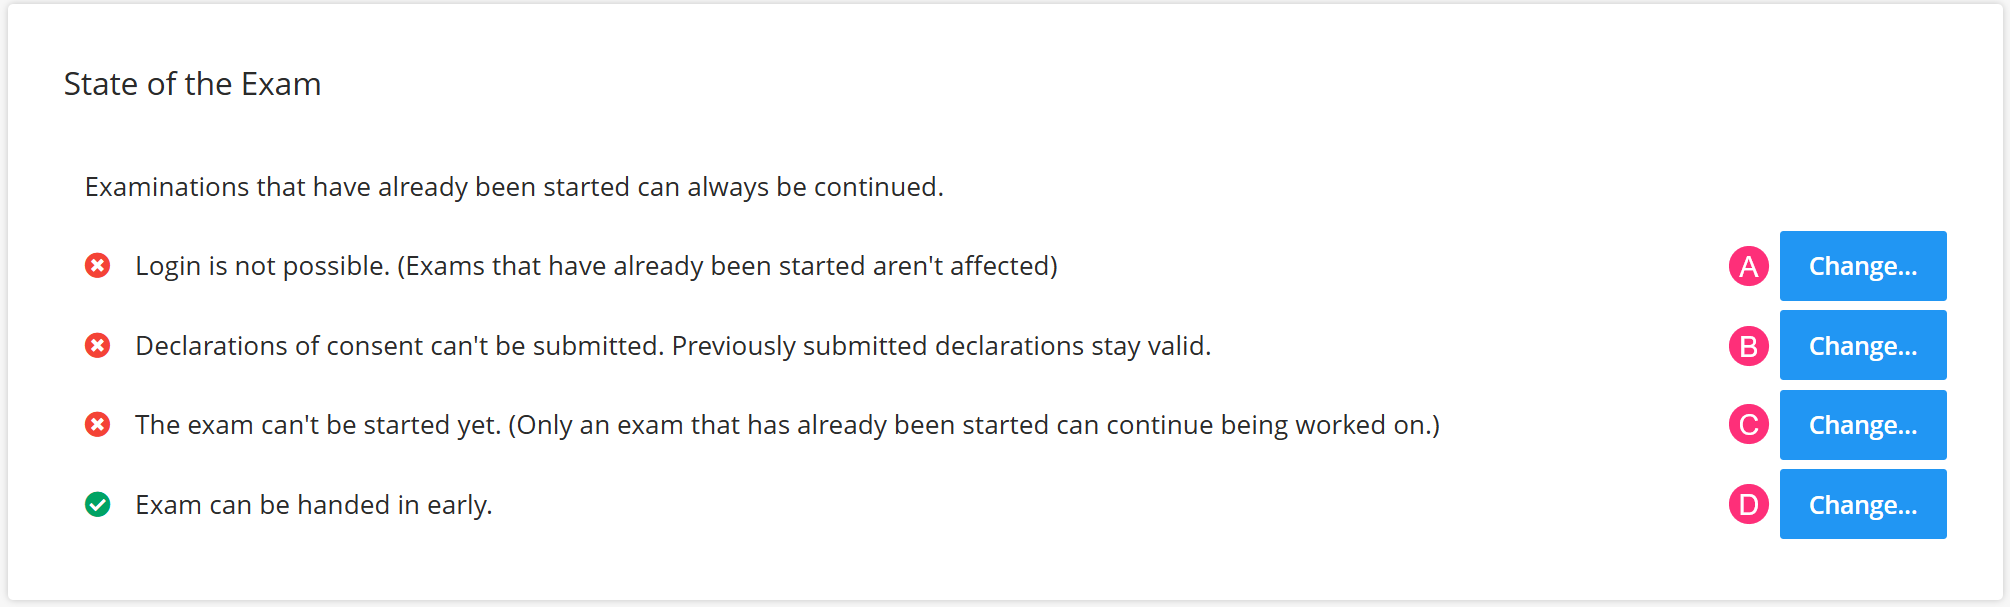
The states A, B and C are initially deactivted, indicated by the symbol
. They are usually activated sequentially (see explanation below). Active states are indicated by the symbol
.
¶ Process
(A): Activate approximately 30 minutes before the start of the exam:
- Inactive state: Login is not possible. (Exams that have already been started aren’t affected)
- Active state: Login is possible.
After deactivation, the exam remains visible to students who are already logged in, but not to others. This can be used in particular for online e-exams to prevent latecomers from gaining access after the start without needing to contact you.
(B): Activate shortly before the start of the exam:
- Inactive state: Declarations of consent can’t be submitted. Previously submitted declarations stay valid.
- Active state: Exam participants receive information about the exam and can submit the declaration of consent in advance.
If a presentation is available, the consent form must be enabled. After completing the consent form, students can view the presentation.
(C): Activate at the start of the exam:
- Inactive state: The exam can’t be started yet. (Only an exam that has already been started can continue being worked on.)
- Active state: The exam can be started. Questions are visible.
In the deactivated state, tasks are not visible or cannot be edited. Activate by clicking Change so that students can begin. The individual timer starts when the exam is launched.
(D): This state is enabled by default. Students can submit the exam early by entering Submit. If this is not desired, change the state to inactive. The exam will then end automatically after the time runs out.
- Inactive state: Exam can’t be handed in early.
- Active state: Exam can be handed in early.
¶ Exam states (with upload phase)
If an upload phase has been defined in the exam development (i.e. a separate time window for file upload), the control overview appears as follows: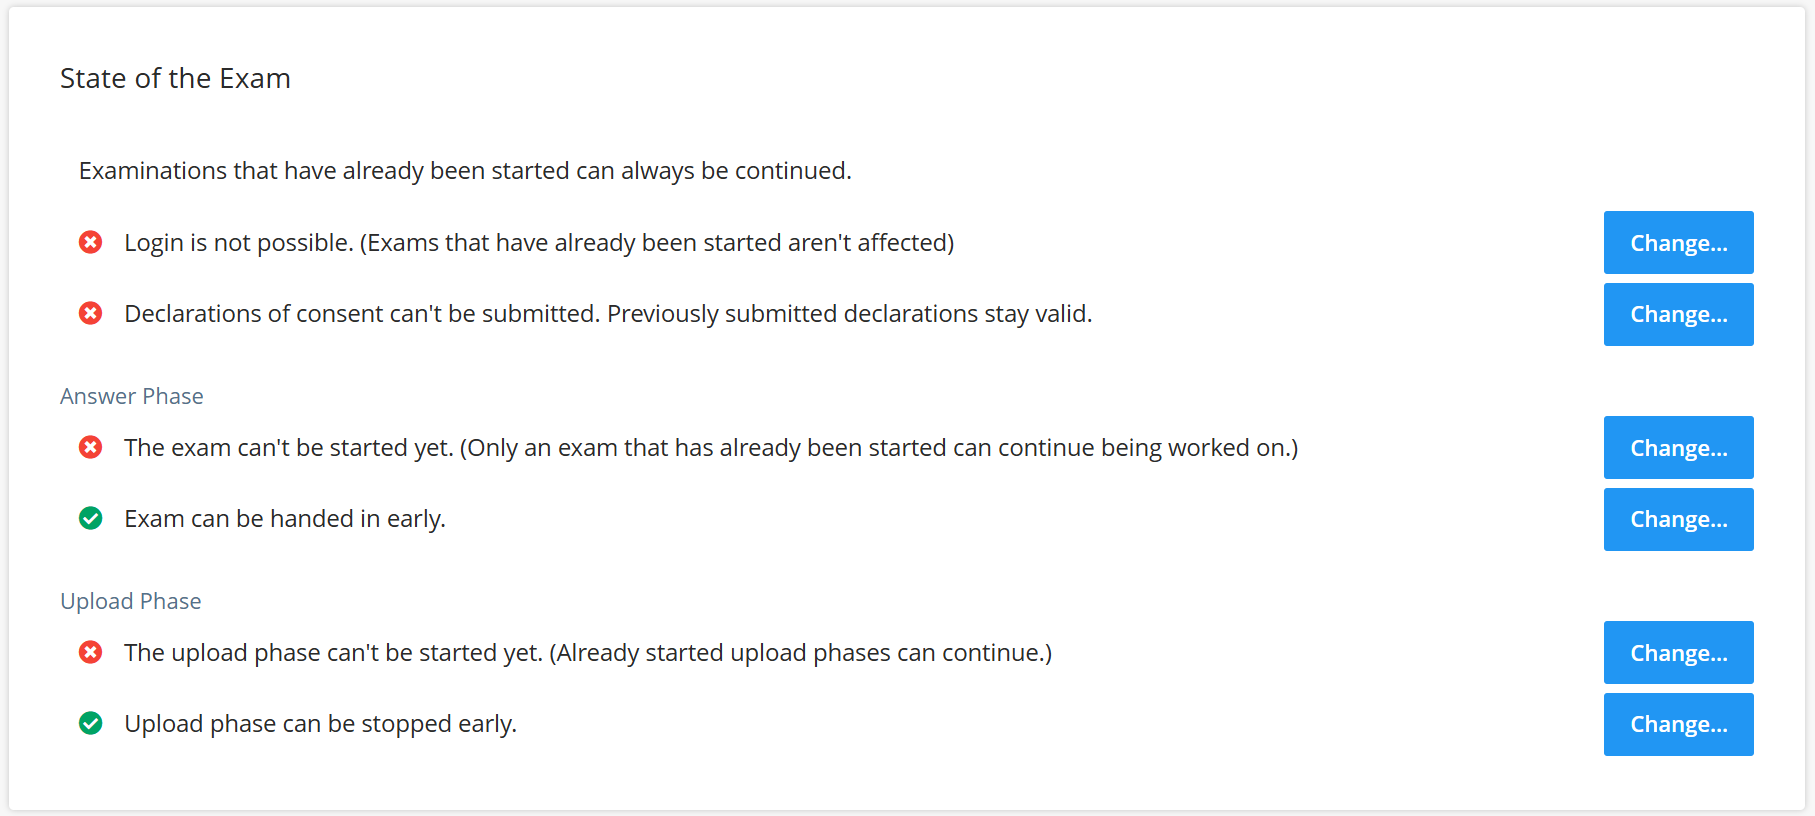
The procedure is generally the same as for exams without an upload phase. However, the control overview is divided into an answer phase and an upload phase. If early submission is enabled during the answer phase, the upload phase becomes accessible once the state is changed from The upload phase can’t be started yet to The upload phase can be started.
Students can already upload files during the answer phase. A notice about the separate upload phase is displayed. During the upload phase, answers can no longer be edited. By default, answers are hidden, but this can be enabled in the exam configuration. You can take a look at the student view here.
¶ Presentation
This section is only displayed if a presentation has been added.
In the Presentation section, you control the display of the exam instructions uploaded during exam creation.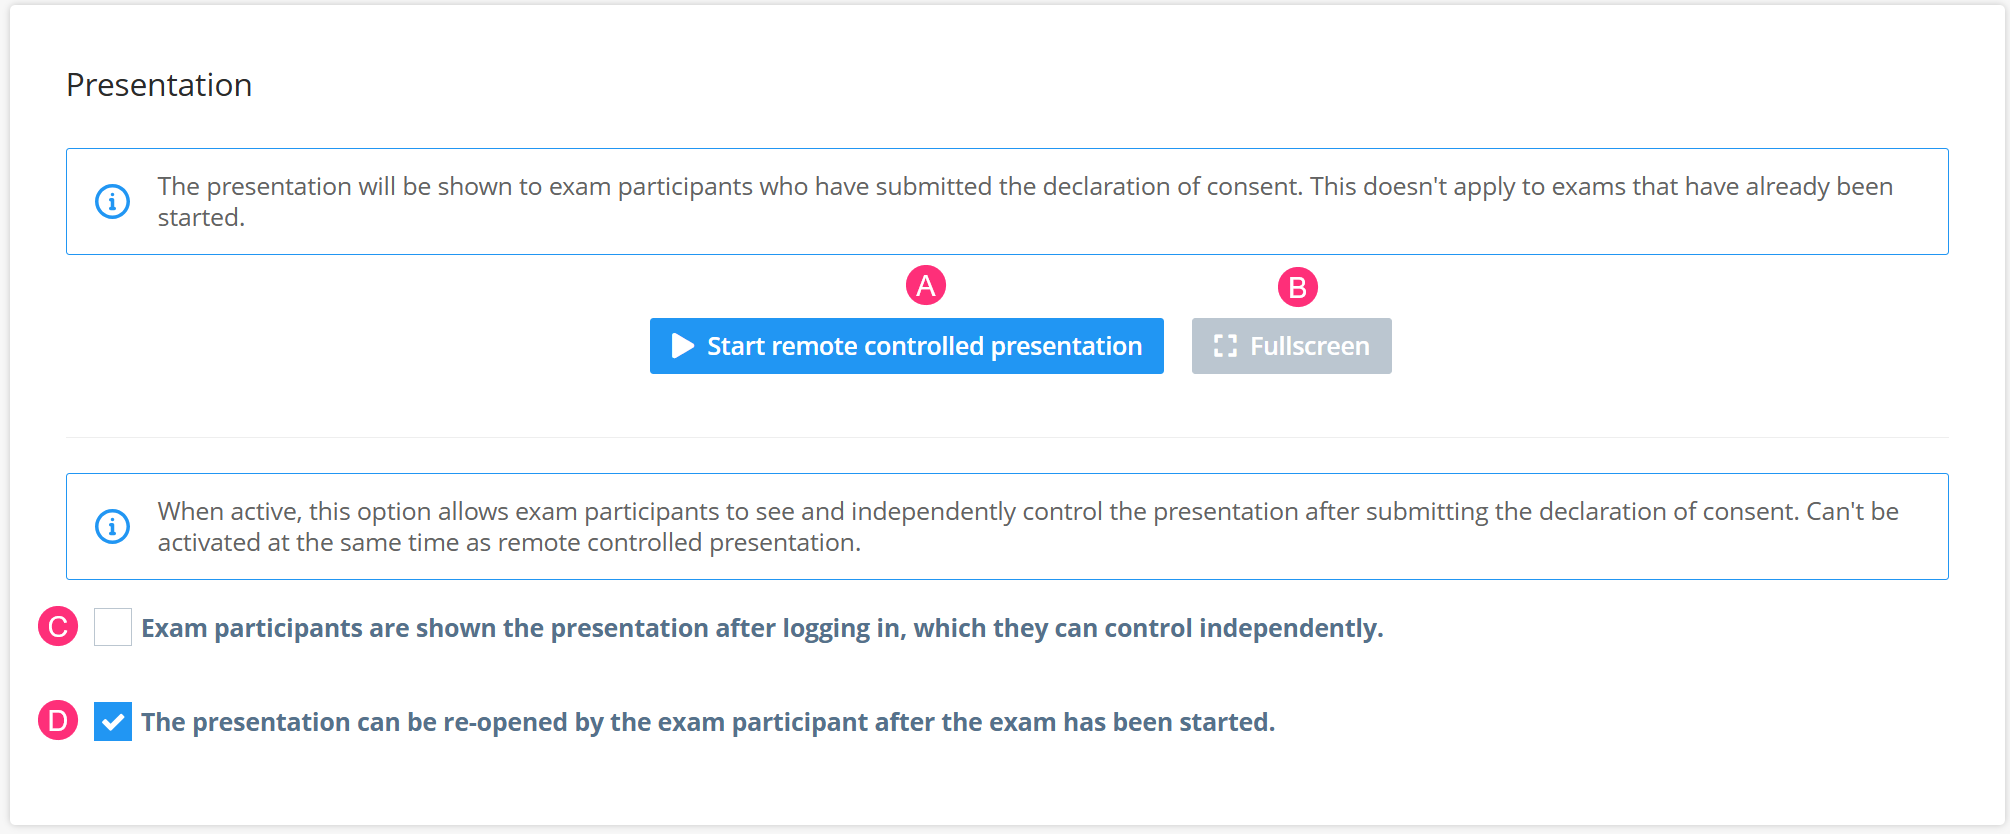
- With Start remote controlled presentation (A) you start the presentation for all students who have submitted the declaration of consent (e.g. health check). Navigate using the arrows. Activate fullscreen mode via Fullscreen (B) and exit it using the x in the top right corner.
- The checkbox Exam participants are shown the presentation after logging in… (C) enables independent navigation through the presentation.
- The checkbox The presentation can be re-opened… (D) allows participants to view the information again during the exam.
You can run the presentation in different ways:
-
Fully remote-controlled:
Start the presentation via (A) and end it with End presentation. The checkbox for independent presentation remains deactivated, and the presentation is fully controlled for the students. -
Fully self-controlled (with option to interruption):
Activate (C). After consent forms, students can navigate through the slides on their own. However, if you start the remote-controlled presentation via (A), self-navigation is immediately interrupted and the presentation becomes remote-controlled. -
Initially remote-controlled, then self-controlled (for latecomers):
First start (A) with the checkbox (C) deactivated. End the presentation using the button (shown while the presentation is active), and then activate (C). Only latecomers can then navigate the presentation independently. Participants who already experienced the remote-controlled presentation will not receive this option retroactively.
¶ Exam participants
The Exam participants section contains control elements and a table with individual status information.
¶ Control elements
This section contains options for filtering, searching, and adding participants, as well as for managing attempts and phases: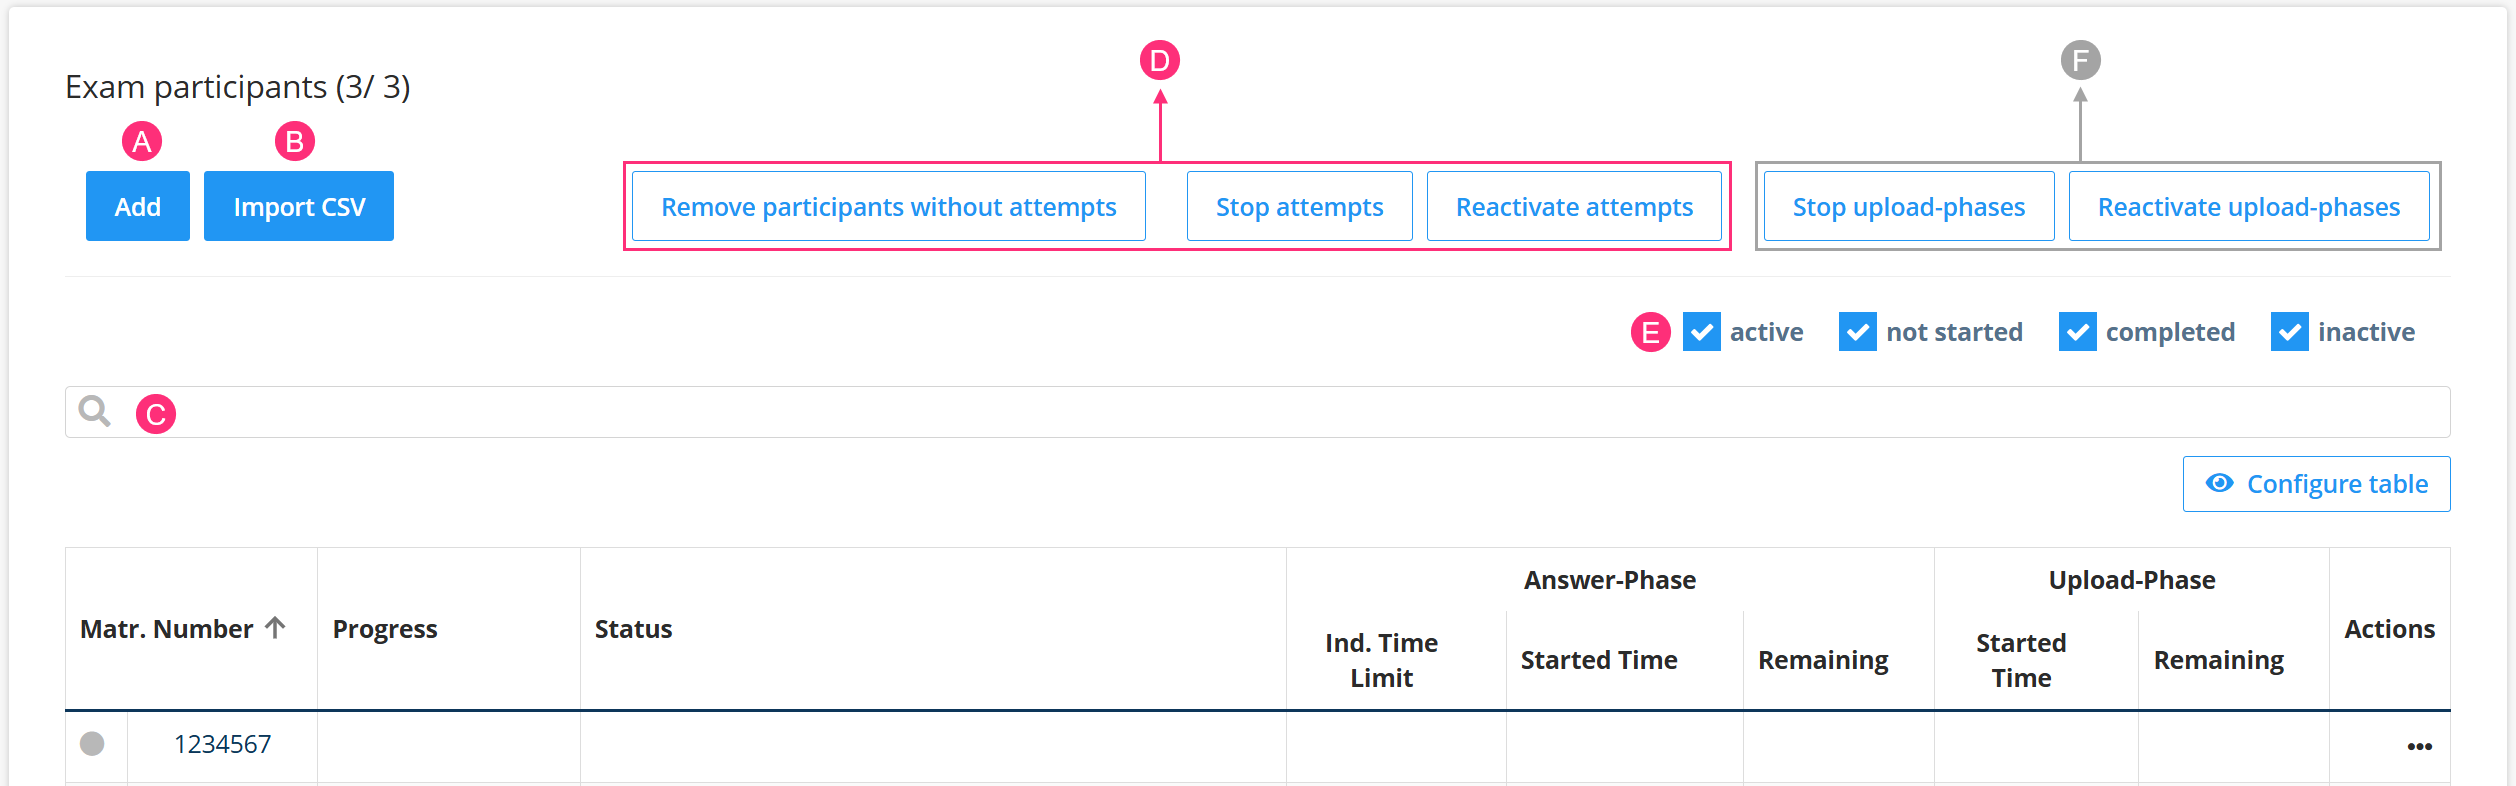
- A: Add individual participants (student ID is sufficient). Also possible after the exam has started.
- B: Add multiple participants via CSV file (usually done by Dynexite administrators).
- C: Search by student ID.
- D: Bulk actions:
- Remove participants without attempts: Remove inactive participants (e.g., in case of absence).
- Stop attempts: Opens a window with checkbox selection. Enter a reason and click Terminate attempts. If an upload phase is included, participants will see the start page of the upload phase.
- Reactivate attempts: Opens a window with checkbox selection. Enter a reason and click Reactivate. If an upload phase is configured, participants will see the start page of the upload phase. If there is remaining working time, returning to the answer phase is possible.
- E: Filter the list according to the following criteria:
- active: Show active participants.
- not started: Show participants who have not yet started.
- completed: Show participants who have submitted their exam.
- inactive: Show participants who have not yet logged in.
- F (only if an upload phase is configured):
- Stop upload phases: Opens a window with checkbox selection. Enter a reason and click Terminate upload phases.
- Reactivate upload phases: Opens a window with checkbox selection. Enter a reason and click Reactivate.
¶ Table
The table shows the status and configuration options for each exam participant: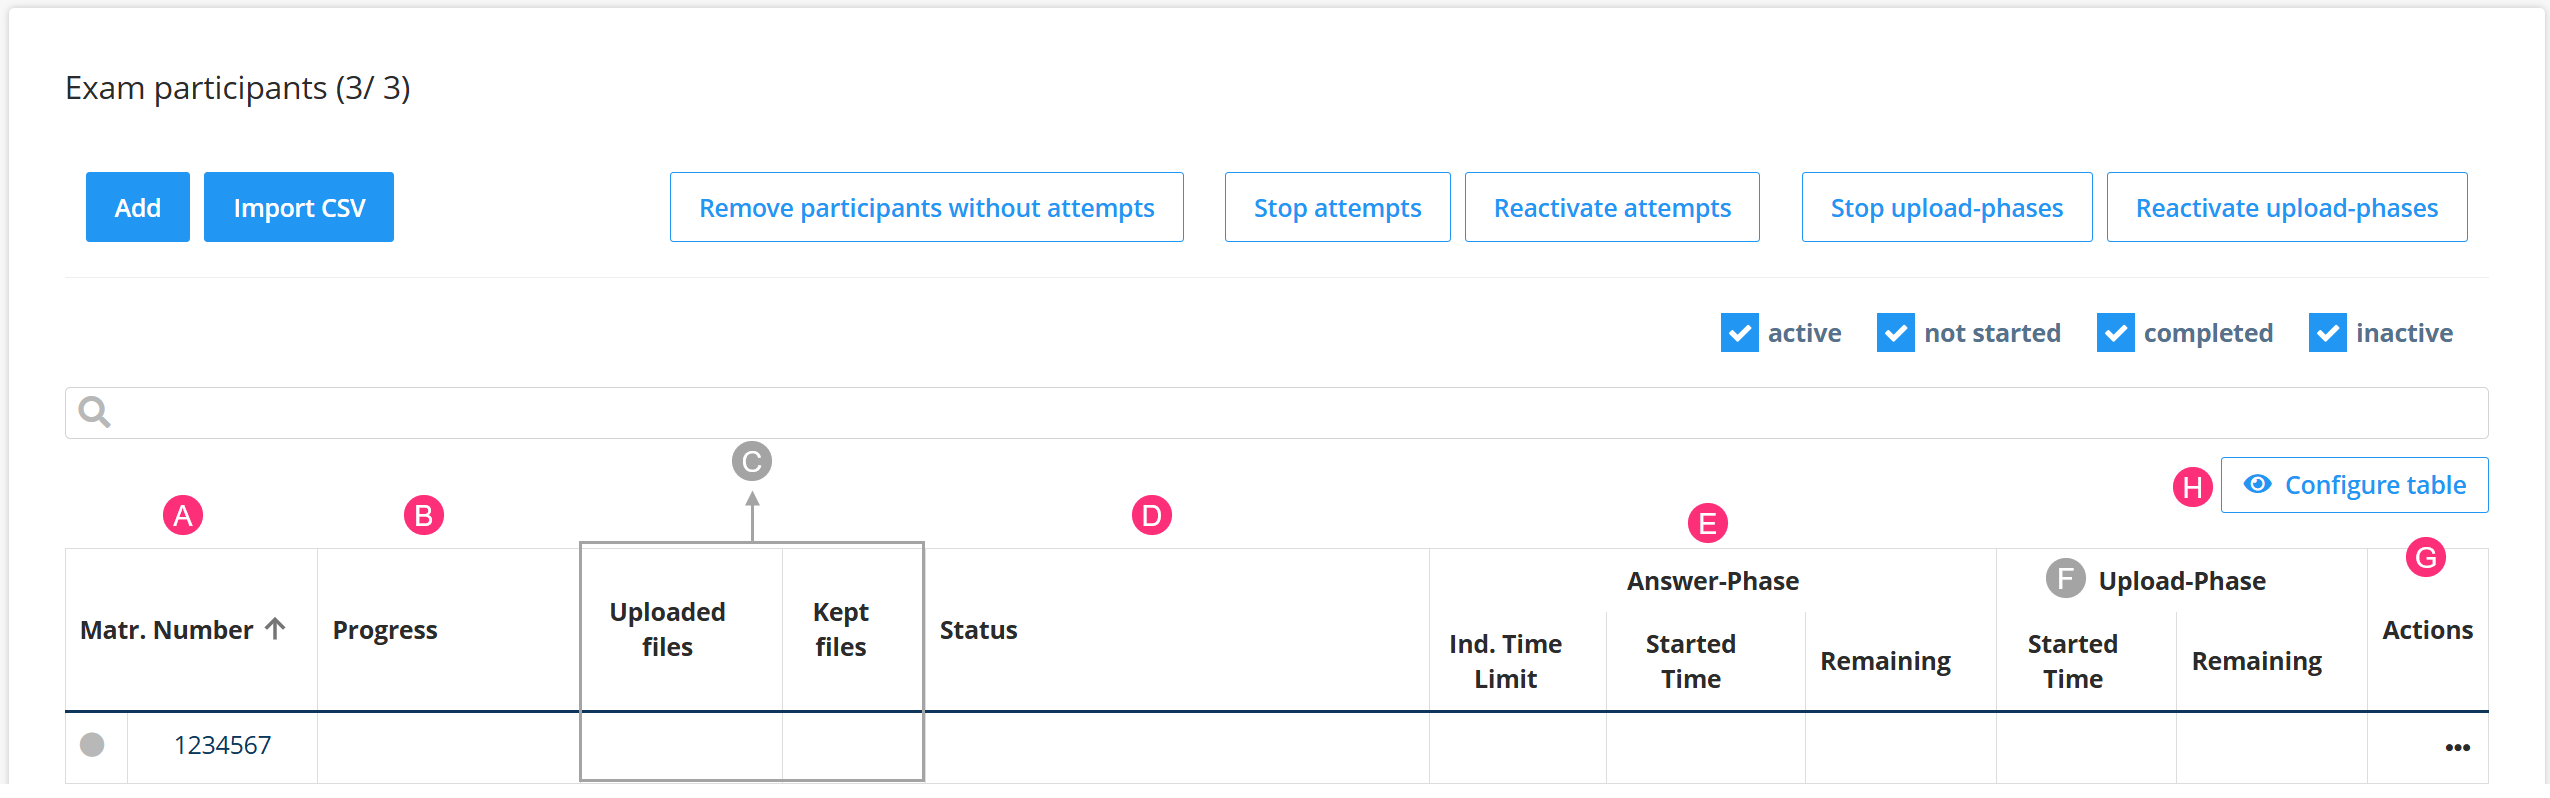
- (A) Connection status (dot next to the student ID):
- Green: active in Dynexite
- Red: connection lost or browser closed
- Grey: inactive
- (B) Progress:
- Displayed as a percentage based on the points of completed tasks. Shows only progress, not an evaluation of the answers.
- Displayed as a percentage based on the points of completed tasks. Shows only progress, not an evaluation of the answers.
- ©: Only for exams with an upload phase. Can be shown or hidden via Configure table and Show uploaded files.
- Uploaded files
- Kept files (excluding deleted ones)
- (D) Status:
- not started
- in exam selection (logged in, exam not started)
- active
- paused
- completed (in case of early submission)
- expired (when exam time has elapsed)
- (E) Started Time and Remaining Time: Shows the exam start time and remaining time. For exams with an upload phase, labeled with „Answer phase“.
- (F) Only for exams with an upload phase: Displays the start time and remaining time of the upload phase.
- (G) Actions (Click on …:):
- Ind. Time to answer: Set a custom exam time for participants with approved compensation for disadvantages (enter the total exam time, not just the additional bonus time). Available only for the answer phase.
- Extend Phase: Grant additional working time. A reason is required. Not possible for submitted attempts.
- Reactivate Phase: Reactivates a submitted attempt or answer phase. A reason is required. If exam time remains, the participant can continue the exam.
- Terminate Phase: Ends the active phase. For exams without an upload phase, this ends the exam. For exams with an upload phase, participants switch to the upload phase.
- Remove: Removes the participant from the list.
- (H) Configure table:
- Show validity: Displays the end time (Valid until) instead of remaining time.
- Show clients: Displays the clients column.
The working time starts individually when each participant begins the exam. Start and remaining times are therefore not the same for everyone. The remaining time is shown to participants in the top right next to their student ID.
In case of an unstable internet connection, connection drops may occur. If these last for several minutes, contact the affected participant.
¶ Finalizing the exam
After all students have completed the exam (submission or time expiry), deactivate the top three states.
Then contact a Dynexite administrator to request a re-import of the exam. After that, you can start the correction.